Which part of the plugin do you need help with?
To apply the RT Blink effect, drag it from the Titles Browser over the target clip or clips in your project.
If you want the effect to exactly match the duration of a single clip, then first make sure
the playhead or skimmer is over the clip and press the X key to mark the clip range. Then, select the RT Blink thumbnail in the Titles Browser and press the Q key to connect it to the clip range.
Once in the project you can drag on the title to reposition it or drag on either end to trim it.
Now, select it, open the Inspector if necessary (Command-4), and select the Title Inspector.
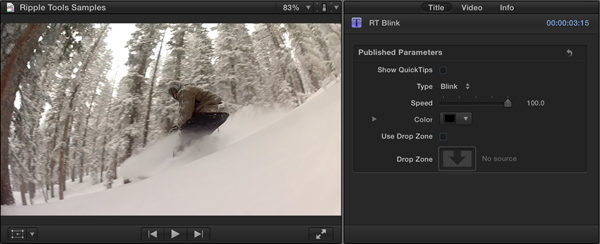
Enable Show QuickTips for some basic information on how to use the effect. RT Blink makes the video blink on and off. You can make it fade on and off instead by changing the Type. Speed changes the rate of blinking. You can set keyframes to make the blink speed change over time. By default, you see black when the video blinks off, but you can change that to any color with the Color swatch.
Or, click the Use Drop Zone checkbox, click the Drop Zone well, then click on a clip in the Event Browser or in the Timeline to see that clip when the video blinks off. Note that the frame you click on will be matched to the current playhead location.
To apply the RT Cloner effect, drag it from the Titles Browser over the target clip or clips in your project.
If you want the effect to exactly match the duration of a single clip, then first make sure the playhead or skimmer is over the clip and press the X key to mark the clip range. Then, select the RT Cloner thumbnail in the Titles Browser and press the Q key to connect it to the clip range.
Once in the project you can drag on the title to reposition it or drag on either end to trim it. Now, select it, open the Inspector if necessary (Command-4), and select the Title Inspector.
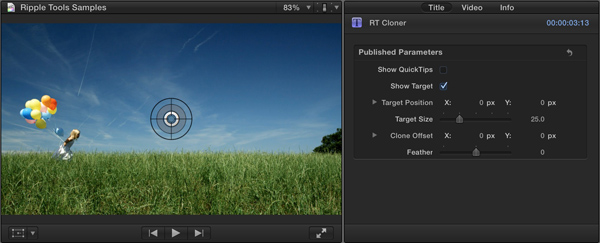
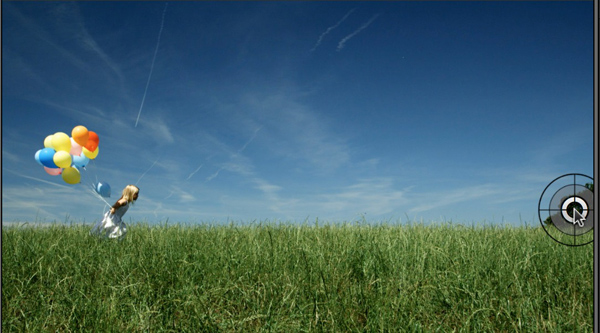
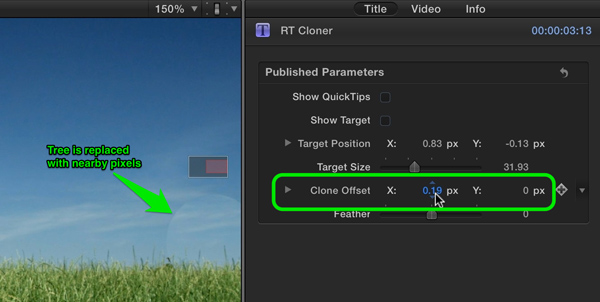
Enable Show QuickTips for some basic information on how to use the effect. RT Cloner allows you to remove small parts of your video by cloning over them with copies of nearby pixels. In the Viewer, drag the On-Screen Control to move the Target over the area you want to remove – in this example, we want to take out the tree on the right side.
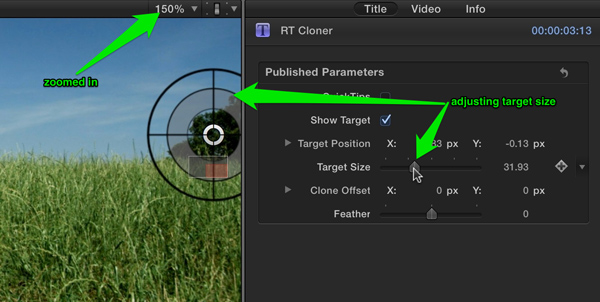
Then, use the Target Size parameter in the Inspector to make the shaded part of the target roughly cover the object (you can zoom in on the Viewer to get a closer look by pressing Command-+).
Next, hide the target by unchecking the Show Target checkbox, and then use the Clone Offset X and/or Y values to replace the target pixels with adjacent pixels.
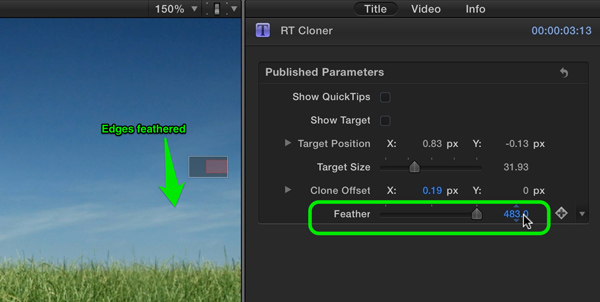
Finally, adjust the Feather value to blend in the edges. You may need to adjust the Target Size after doing so.
A few tips:
1.) This effect works best on an object that isn’t moving in the frame. If the object you are removing is moving (either because it moves or because the camera moves) you will need to animate the Target Position with keyframes to follow it. You may also need to animate the Clone Offset to change what replacement pixels are being used.
2.) You want to avoid any moving objects from crossing the cloned area. In this example, when the girl runs to to the edge of the frame, her pixels get cloned into the target area.
To apply the RT Glow effect, drag it from the Titles Browser over the target clip or clips in your project.
If you want the effect to exactly match the duration of a single clip, then first make sure the playhead or skimmer is over the clip and press the X key to mark the clip range. Then, select the RT Glow thumbnail in the Titles Browser and press the Q key to connect it to the clip range.
Once in the project you can drag on the title to reposition it or drag on either end to trim it. Now, select it, open the Inspector if necessary (Command-4), and select the Title Inspector.
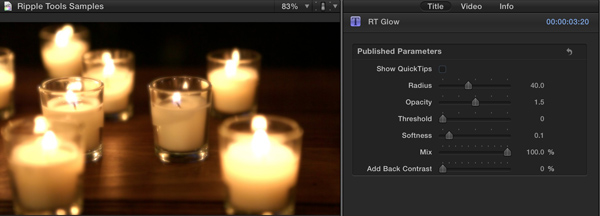
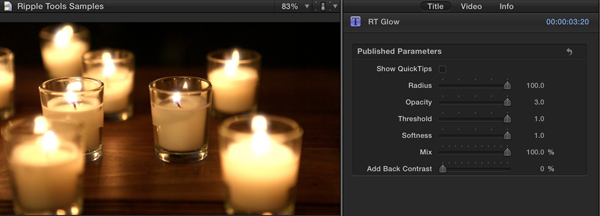
Enable Show QuickTips for some basic information on how to use the effect. RT Glow includes several parameters for adjusting the look of the glow – how you use them depends on the shot and what you want to accomplish. Radius spread out the glow. Opacity reveals more or less glow. Threshold determines the brightness of source pixels that are included in the glow effect. As you drag to the right, only the brighter pixels are affected.
Softness spreads out the glow and can be seen better when Radius is set high. Mix blends in the glow to the original shot – at 0%, the glow is turned off completely. If the glow effect makes the overall scene too bright, use the Add Back Contrast slider to darken the shadows.
Glow off:
Glow with all parameters at maximum values:
Side by side:
To apply the RT Lens Blur effect, drag it from the Titles Browser over the target clip or clips in your project.
If you want the effect to exactly match the duration of a single clip, then first make sure the playhead or skimmer is over the clip and press the X key to mark the clip range. Then, select the RT Lens Blur thumbnail in the Titles Browser and press the Q key to connect it to the clip range.
Once in the project you can drag on the title to reposition it or drag on either end to trim it. Now, select it, open the Inspector if necessary (Command-4), and select the Title Inspector.
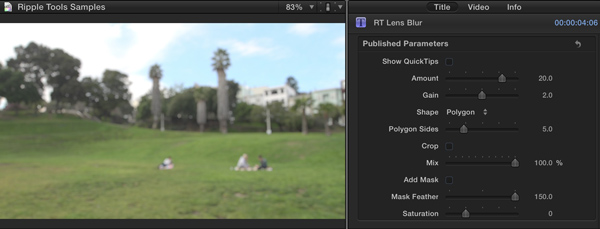
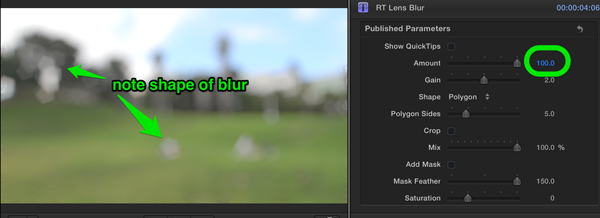
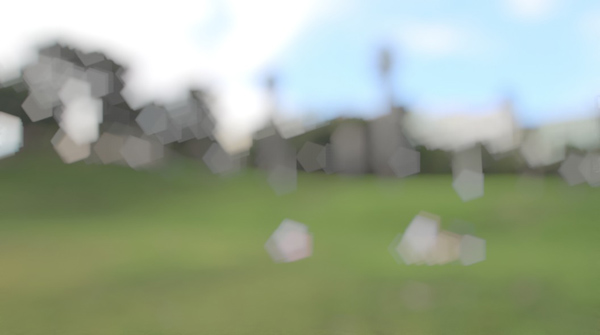
Enable Show QuickTips for some basic information on how to use the effect. RT Lens Blur simulates the blur seen through the lens of a camera (also known as “bokeh”). As such, it can be slow to render. To create more blur, drag directly on the Amount value field or type in a value – the slider only goes to 25 but you can go up to 100.
Gain increases the brightness of the light areas.
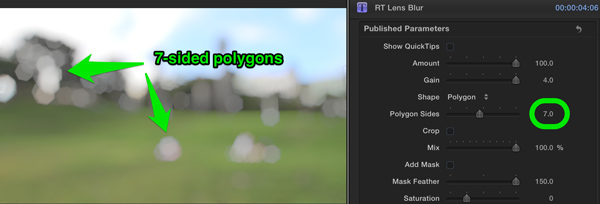
Don’t set the gain too low at high blur amounts – you can get artifacts on the edges. You can change the Shape of the blurred areas – but if you leave it at Polygon, you can change the number of sides.
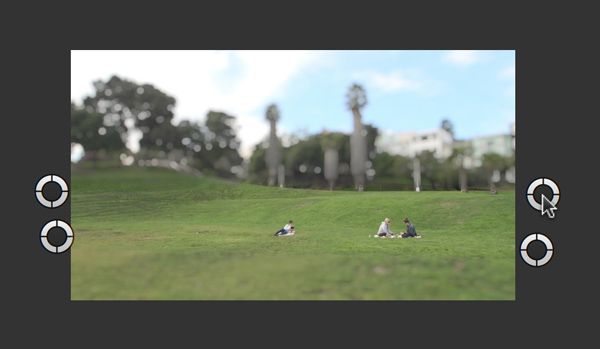
By clicking the Add Mask check box, you can choose a rectangular area of the frame to stay in focus. To adjust the mask, zoom on in the Viewer (use the drop-down menu at the top right or press Command– (minus). Then drag the on-screen controls to adjust the mask position. Tip: do this with a very low Amount value – if Amount is high, the on-screen controls won’t be very responsive as the blur takes a while to calculate.
Once adjusted, crank the Amount back up to taste and increase the Mask Feather amount. If you also increase Saturation, you can create a cool Tilt-Shift effect where it looks like everything is a miniature model – this effect works especially well on time-lapse footage.
To apply the RT Rays effect, drag it from the Titles Browser over the target clip or clips in your project.
If you want the effect to exactly match the duration of a single clip, then first make sure the playhead or skimmer is over the clip and press the X key to mark the clip range. Then, select the RT Rays thumbnail in the Titles Browser and press the Q key to connect it to the clip range.
Once in the project you can drag on the title to reposition it or drag on either end to trim it. Now, select it, open the Inspector if necessary (Command-4), and select the Title Inspector.
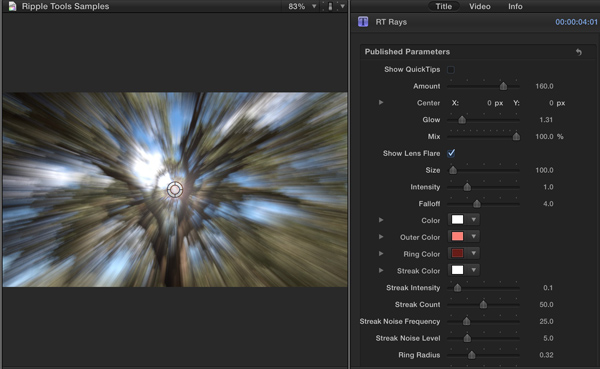
Enable Show QuickTips for some basic information on how to use the effect. RT Rays includes many parameters for adjusting the location and amount of rays. In addition, you can add a lens flare that tracks with the ray center, and includes many parameters for adjusting the intensity and colors of the flare. The default effect can be a little strong if you want realistic-looking rays.
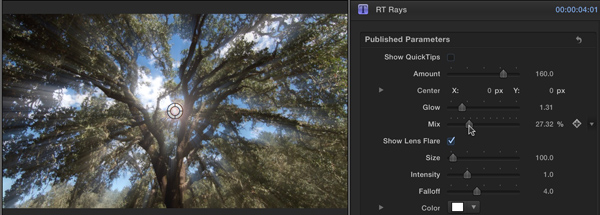
Try lowering the Mix first, instead of Amount, to modulate the effect:
Use the On-Screen Control to move the center point from which the rays emanate. You can also move this point by using the Center X and Y parameter in the Inspector. You can set keyframes for these parameter to move the center over time.
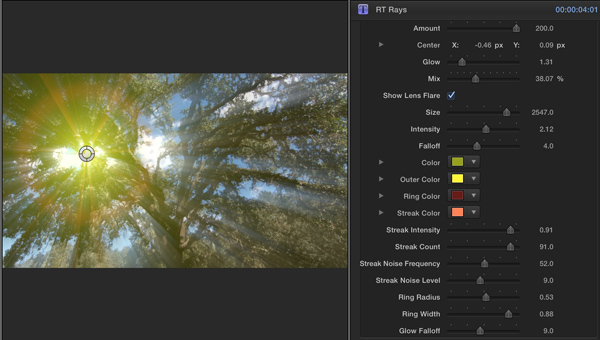
The remaining parameters are pretty straight-forward. Experiment with different values to create different looks. Here’s an example:
Try out animating the Streak Noise level for an interesting look, especially if the Center is animated (just a little goes a long way).
To apply the RT Repeat effect, drag it from the Titles Browser over the target clip or clips in your project.
If you want the effect to exactly match the duration of a single clip, then first make sure the playhead or skimmer is over the clip and press the X key to mark the clip range. Then, select the RT Repeat thumbnail in the Titles Browser and press the Q key to connect it to the clip range.
Once in the project you can drag on the title to reposition it or drag on either end to trim it. Now, select it, open the Inspector if necessary (Command-4), and select the Title Inspector.
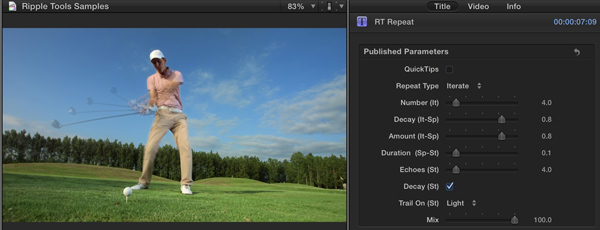
Enable Show QuickTips for some basic information on how to use the effect. RT Repeat overlays copies of your video clips from different points in time, creating an echo effect. The effect works best in shots where there is one primary moving object – often a locked-down camera will also help.
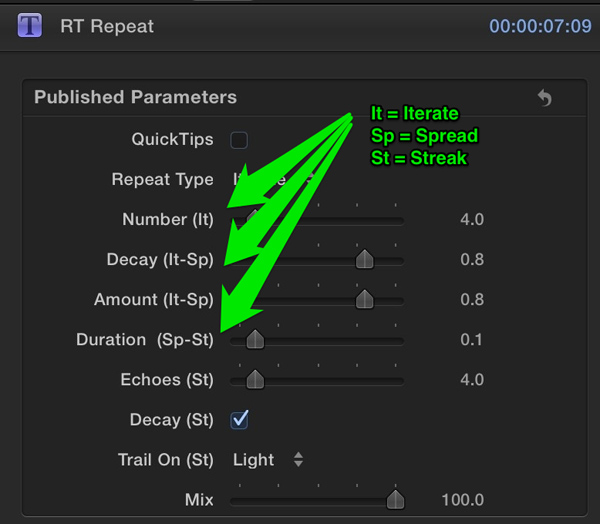
There are three different types of repeating to choose from using the Repeat Type menu: Iterate (the default), Spread, and Streak. Which one is appropriate depends on the type of shot and the type of look you want to create. The parameters below the Repeat Type only work on certain repeat types, as indicated by the abbreviations in parentheses after each parameter name (It = Iterate, Sp = Spread, St = Streak).
For example, the Number parameter only works if you’ve selected the Iterate type; Duration only works on Spread and Streak repeat types. Choose a Repeat Type, and try adjusting the parameters for that type. Depending on your footage, certain types will be more interesting than others. Also, settings that may not look that interesting on a still frame may look very good when the video is playing.
Here’s an example using the Streak repeat type, with the Trail On parameter set to Dark and Decay unchecked:
Play with the Mix slider to add the original shot back in.
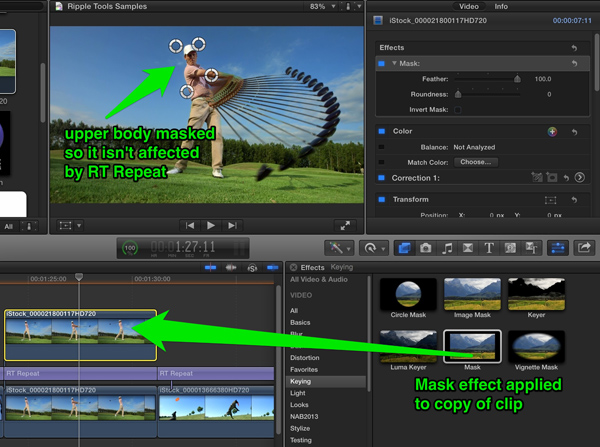
You can also mask certain areas by duplicating the original shot on top of the effect and masking it with the built-in Mask effect from the Keying category of the Effects Browser.
To apply the RT Retimer effect, drag it from the Titles Browser over the target clip or clips in your project.
If you want the effect to exactly match the duration of a single clip, then first make sure the playhead or skimmer is over the clip and press the X key to mark the clip range. Then, select the RT Retimer thumbnail in the Titles Browser and press the Q key to connect it to the clip range.
Once in the project you can drag on the title to reposition it or drag on either end to trim it. Now, select it, open the Inspector if necessary (Command-4), and select the Title Inspector.
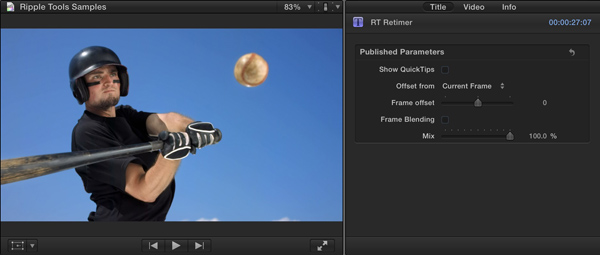
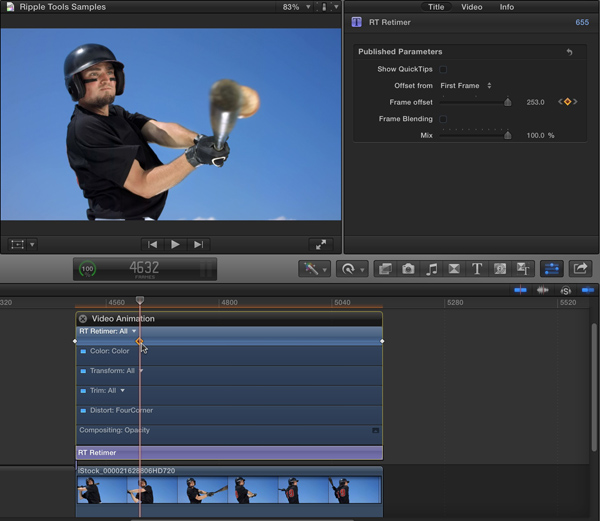
Enable Show QuickTips for some basic information on how to use the effect. RT Retimer uses a different approach than the retiming functionality built into FCPX. With the built-in approach, when you speed a clip up or slow it down, it changes duration – and if you want to speed-ramp a clip (have it’s speed change over time so that it speeds up, slows down, freezes and/or reverses), there’s no easy way to accomplish that task. RT Retimer lets you retime video without changing the clip duration.
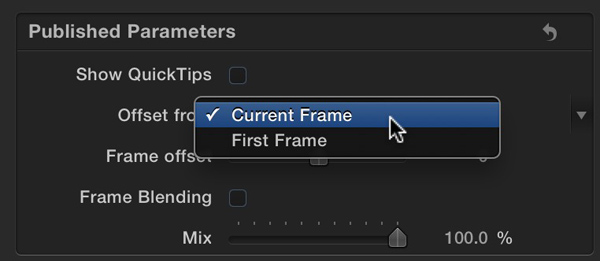
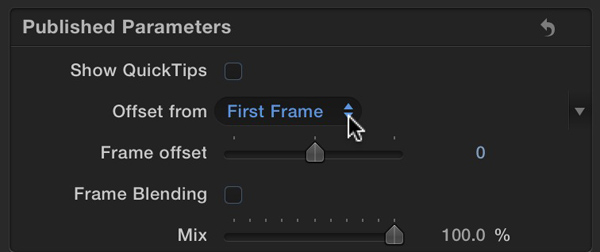
It works best on clips that were shot with a high frame rate so that at normal playback, they appear to play in slow motion. But it can be applied to any type of video clip. Of all the effects in the Ripple Tools II collection, this one takes the most time to understand how to work with it. But it’s not difficult. There are two different ways you can retime your video: either by offsetting from the Current Frame, or from the First Frame. You choose your method in the Offset from pop-up menu in the Inspector.
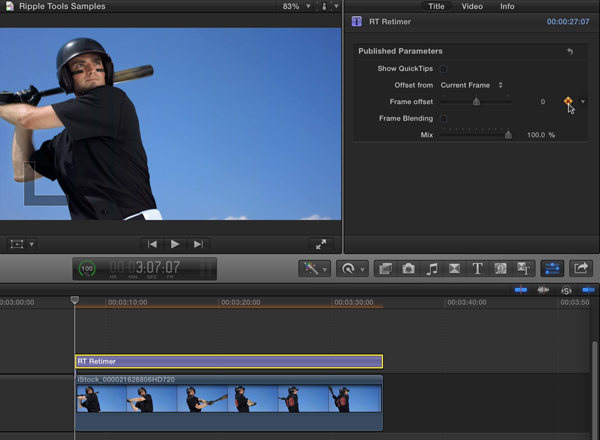
Method 1: Frame offset set to Current Frame. This the default method. The video plays normally until you set keyframes. Step 1: With the playhead on the first frame of the effect, set a keyframe for the Frame offset at 0.
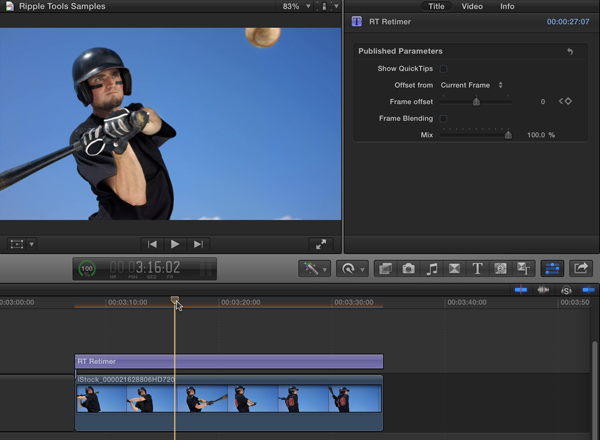
Step 2: Move the playhead to a point in time to where you want to move a frame. In this example, I want to move the frame where the batter contacts the ball earlier in time, so I first move to the time where I want that frame to appear, at 3:16:02.
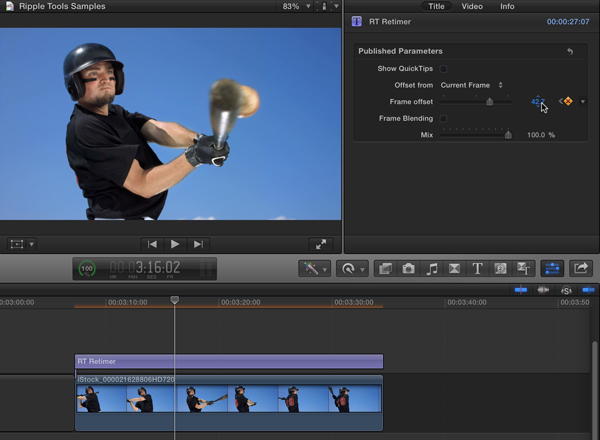
Step 3: Drag the Frame Offset slider or value field until the frame you want appears. So in the example, I drag until I see the frame where he contacts the ball.
The clip will now be retimed so that the target frame appears at the target time without changing the clip duration. In my example, the video will play faster up until he hits the ball, then will play slower for the rest of the clip – but the overall clip duration remains the same. If you select the RT Retimer effect and press Control-V (or choose Clip > Show Video Animation), you can see the keyframes.
Important: moving the keyframe with Method 1 changes the frame that plays on the keyframe – this is because, in this case, the frame at the keyframe is always 42 frames away from what was there originally. If you want to move the frame of the guy contacting the ball somewhere else, you would need to move it and then adjust the Frame offset value once again.
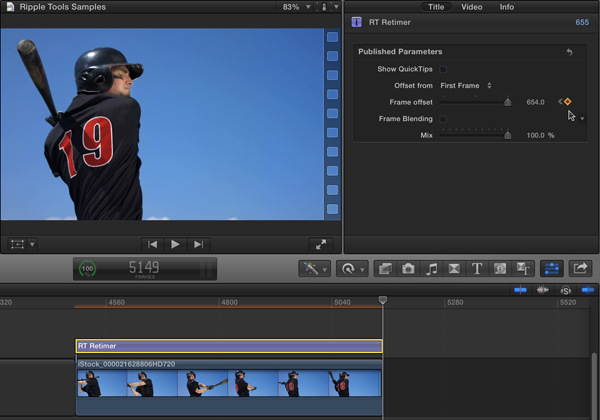
Method 2: Frame offset from set to First Frame. This method takes a few steps to set up, but then it works more intuitively (in my opinion of course). By default, the clip is frozen on the first frame, so with the first 2 steps you make it play normally.
Step 1: With the playhead on the first frame of the clip set a keyframe for the Frame Offset at 0. (Same as Method 1).
Step 2: Move the playhead to the end of the RT Retimer effect (down arrow, left arrow), then change the Frame Offset to one frame less than the number of frames in the clip. Now the clip will play normally.
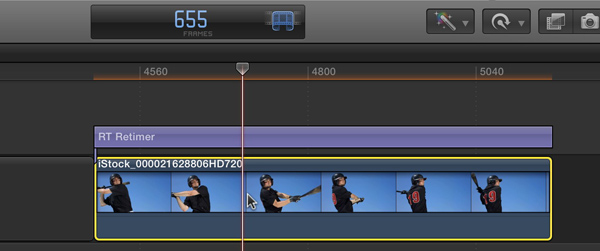
NOTE: to determine the number of frames in the clip, choose Final Cut Pro > Preferences, and in the Editing pane, change the Time Display to Frames. Then close the Preferences window, select the video clip, and press Control-D. The Dashboard will show the number of frames in the clip. In my example, my clip has 655 frames.
The video will now play normally.
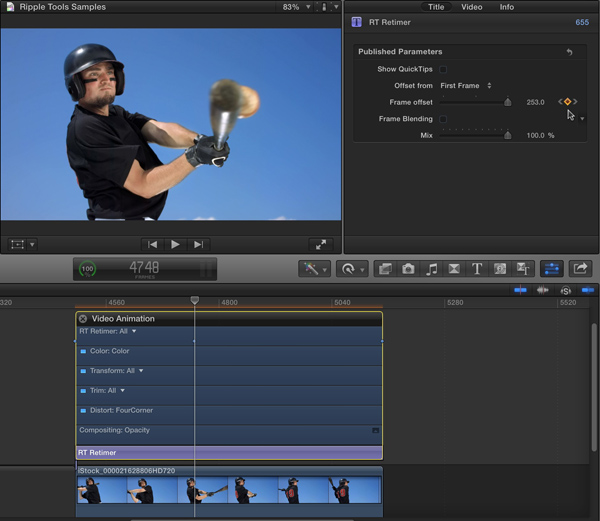
Step 3: Move the playhead to a frame you want to move. Set a keyframe, then press Control-V to open the Video Animation editor. Again, in this example, I want to move the frame where the batter contacts the ball. So this time, I move to that specific frame (not to where I want it to end up, as in Method 1).
Step 4: You can now move this frame anywhere else in the clip. If you move it earlier, the frames before will play faster and the frames after will play slower.
You can of course add as many keyframes as you like to speed up, reverse, or freeze the video, so have fun.
Note: Frame Blending and Optical Flow retiming (invoked when you change the Video Quality in the Retime menu) are not available for this effect due to how Final Cut Pro X handles title effects.
To apply the RT Text Crawl effect, drag it from the Titles Browser over the target clip or clips in your project.
If you want the effect to exactly match the duration of a single clip, then first make sure the playhead or skimmer is over the clip and press the X key to mark the clip range. Then, select the RT Text Crawl thumbnail in the Titles Browser and press the Q key to connect it to the clip range.
Once in the project you can drag on the title to reposition it or drag on either end to trim it. Now, select it, open the Inspector if necessary (Command-4), and select the Title Inspector.
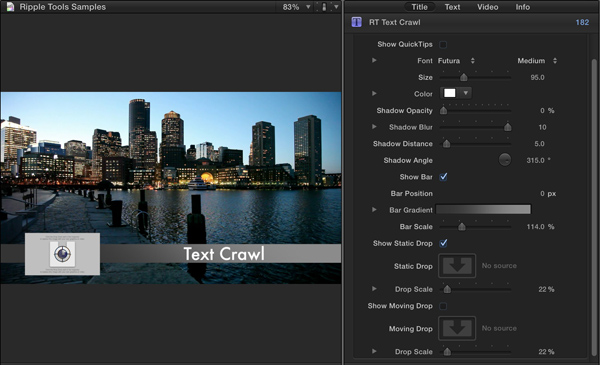
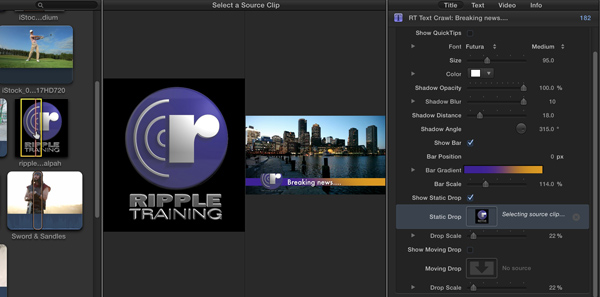
Enable Show QuickTips for some basic information on how to use the effect. RT Text Crawl animates text across the bottom of the screen from right to left over a gradient bar. You can reposition the text and gradient independently (just drag on the text in the Viewer to move it; to move the Gradient, drag the value field for the the Bar Position parameter).
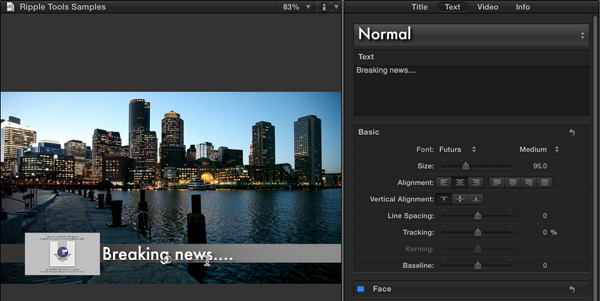
You can change the Font, Size, and Color, and Drop Shadow properties of the text directly in the Title Inspector. If you want to add an outline, go to the Text Inspector. To change the text itself, just double-click the effect and start typing – or go to the Text Inspector and enter it in the box at the top. If you want the same message to repeat, just copy-paste it in that text box.
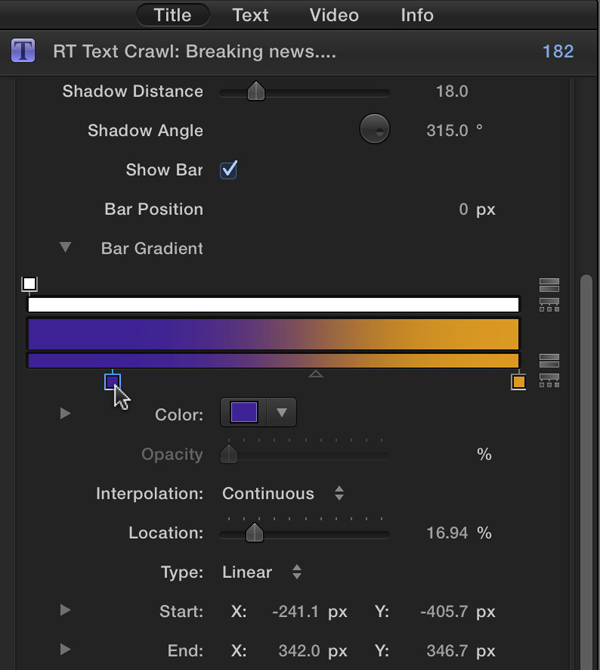
You can turn the bar off if you don’t want to see it. Or, change its colors by opening the Bar Gradient and manipulating the color tags.
Add more tags by double-clicking the lower colored bar. Remove tags by dragging them off. Change colors by clicking the Color swatch to bring up the OS X Color Picker (which includes a magnifying glass for picking colors right from your video). Or, simply right or control-click on a color tag to quickly select a color. You can even change the Start and End points of the gradient to give it a different angle.
You have the choice of a static drop zone that stays wherever you place it, or an animated drop zone that moves with the text (and can be placed anywhere as well). Or, you can turn them both off. Enable the one you want (the static drop zone is enabled by default), then click the well and select your graphic or video from an Event or from a Project to use.
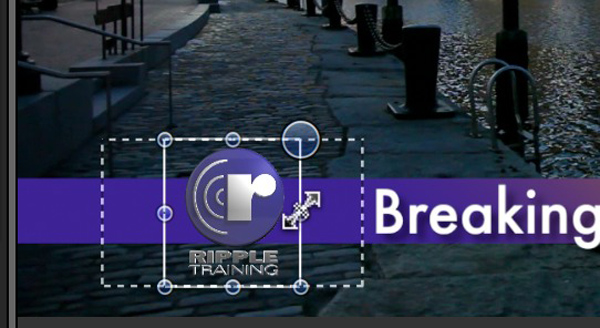
To scale a graphic within a drop zone, double-click on it and drag a bounding box handle.
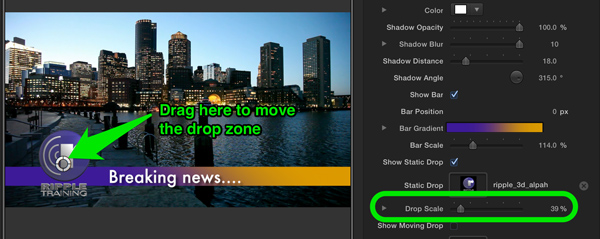
To change the scale of the drop zone itself, use the Drop Scale parameter in the Title Inspector.
To make the text move faster or slower, simple trim the duration of the title effect.
To apply the RT Text Path effect, drag it from the Titles Browser over the target clip or clips in your project.
If you want the effect to exactly match the duration of a single clip, then first make sure the playhead or skimmer is over the clip and press the X key to mark the clip range. Then, select the RT Text Path thumbnail in the Titles Browser and press the Q key to connect it to the clip range.
Once in the project you can drag on the title to reposition it or drag on either end to trim it. Now, select it, open the Inspector if necessary (Command-4), and select the Title Inspector.
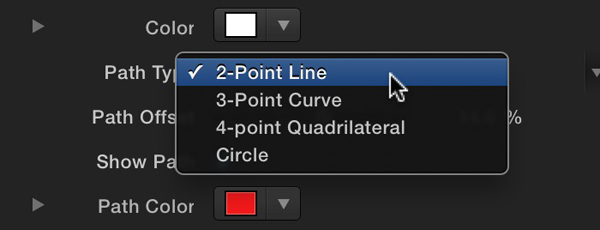
Enable Show QuickTips for some basic information on how to use the effect. RT Text Path lets you choose from four different path types. Here’s a typical workflow:
1) Choose a Path Type
2) Adjust the Font, Size, and Color of the text. You can do all this directly in the Title Inspector. If you want an outline, glow, or drop shadow, use the Text Inspector.
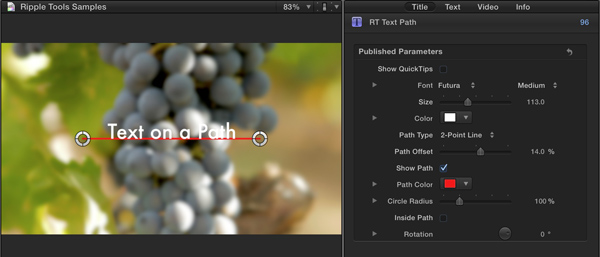
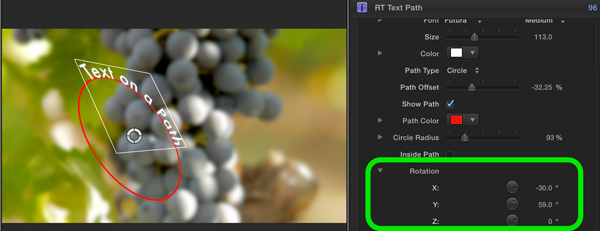
3) Adjust the path. The path is visible just to help you in adjusting it. Change the Path Color if your background makes it hard to see. Drag the On-Screen controls to change the path. You can also use the Transform Effect (click the button at the bottom left of the Viewer) to scale and rotate the path – this can be helpful to rotate the Curve path type so that it bends the way you want it to.
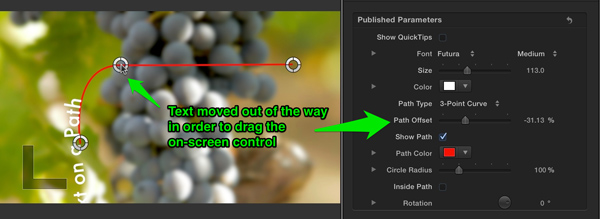
VERY IMPORTANT TIP: You cannot drag the On-Screen Controls if the text box is over them. So, just drag the Path Offset slider to temporarily move the text out of the way while you adjust the path.
4) Adjust the Path Offset to place the text where you’d like. Uncheck the Show Path checkbox to hide the path.
You also set keyframes for the Path Offset parameter to animate the text along the path – for example, to slide it on-screen or off.
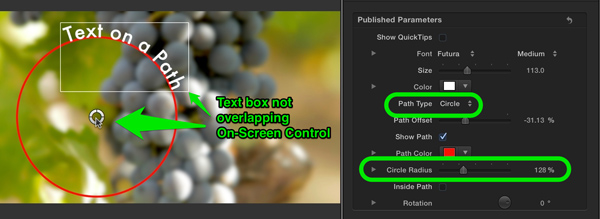
Tip 1: If you select the Circle path type, use the Circle Radius parameter to adjust the size of the circle. Make the radius large enough so that the text box doesn’t overlap the On-Screen Control, then move the circle where you want it, then reset the radius as desired.
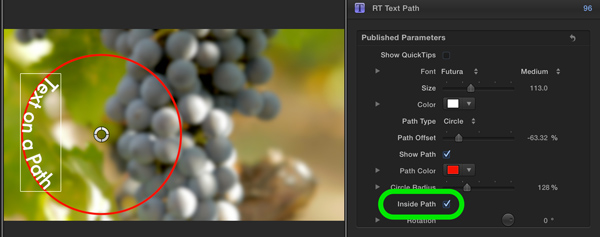
Tip 2: For the Circle and Quadrilateral options, the Inside Path checkbox will move the text inside the path.
Tip 3: If you click the disclosure triangle for Rotation, you’ll find that you can rotate the path on X, Y, and Z, for some interesting 3D effects.
To apply the RT Text Scroll effect, drag it from the Titles Browser to your project. It can be placed over a clip as a connect edit, or often it is used on its own at the end of a project.
If you want the effect to exactly match the duration of a single clip, then first make sure the playhead or skimmer is over the clip and press the X key to mark the clip range. Then, select the RT Text Scroll thumbnail in the Titles Browser and press the Q key to connect it to the clip range. To quickly add it to the end of a project, select it and press the E key for an Append edit.
Once in the project you can drag on the title to reposition it or drag on either end to trim it (note: trimming the duration will not impact the scrolling speed). Now, select it, move the playhead to a point where you can see the start of the text, open the Inspector if necessary (Command-4), and select the Title Inspector.
Enable Show QuickTips for some basic information on how to use the effect.
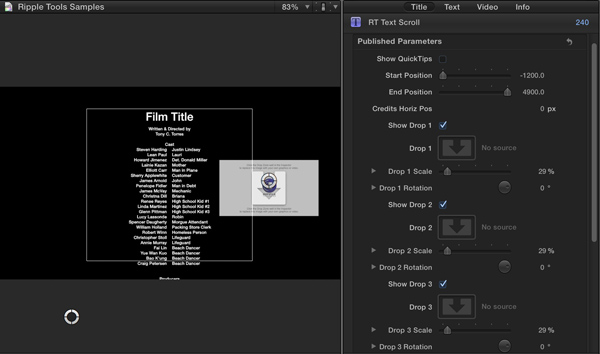
RT Text Scroll includes a large amount of dummy text and 4 drop zones that all automatically scroll up the screen for the duration of the effect, starting and ending on a black screen. Note that if you trim the effect, you won’t affect the scrolling speed – so if you make it shorter, the credits won’t finish. You can adjust that easily with the Start Position and End Position values. More on that in a moment.
Workflow:
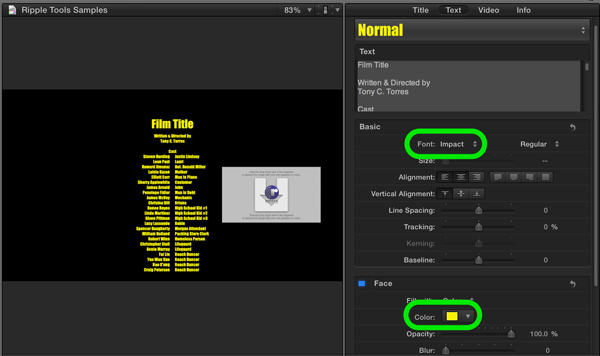
1) Change the overall Font and Color in the Text Inspector.
Do not change anything else here.
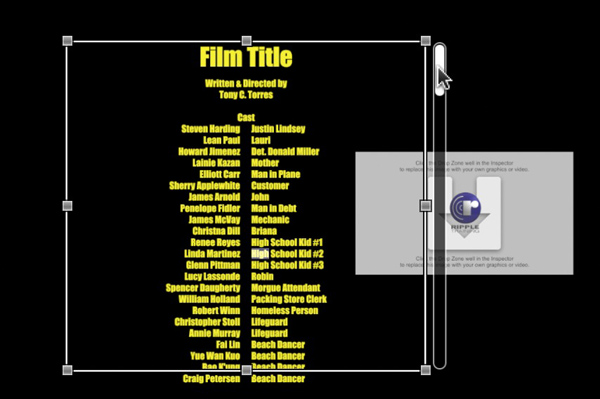
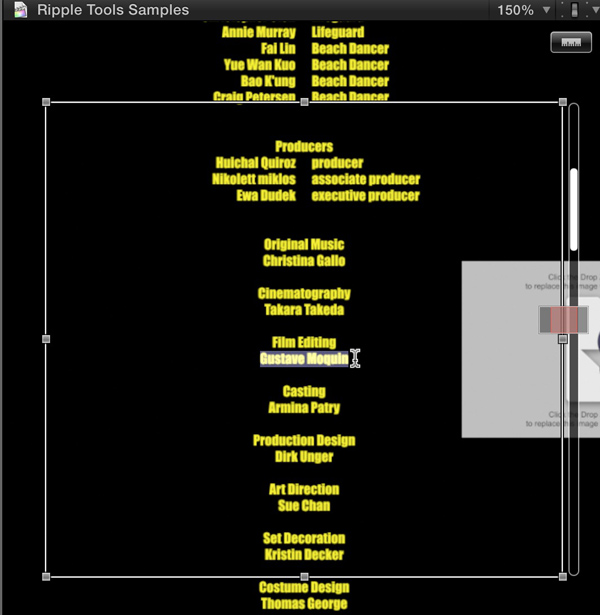
2) Double-click the text in the Viewer to reveal a text box and scroll handle for moving to any part of the credits.
3) Double-click on individual words to change them. Press Command-+ to zoom in to better see the text. If you want to delete a bunch of text, select it all and press the Delete key. Don’t uses the text box in the Text Inspector as you can lose the formatting.
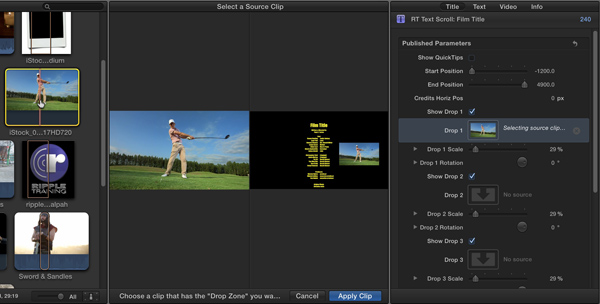
4) When you are finished editing the text, press the Escape key to exit text entry mode, press Shift-Z to fit the clip back to the Viewer window, and select the Title Inspector. Disable any drop zones you don’t want by unchecking the Show Drop check box. Add content to the drop zones you do want by clicking the well, then selecting a clip or graphic from an event or from a project.
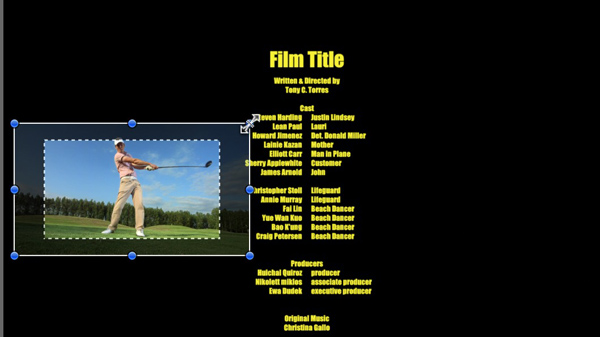
5) Change the position of the drop zones by dragging them directly in the Viewer with the On-Screen control. Change their scale using the Drop Scale slider in the Title Inspector. To change the scale or position of content within a drop zone, just double-click the drop zone directly in the Viewer and drag.
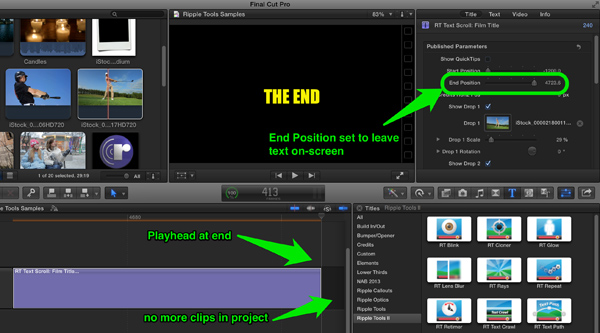
6) Finally, trim the effect to the duration you want the credits to last, and adjust the End Position value with the playhead on the last frame until the credits are off the screen.
Tip: if you want the credits to stop before leaving the screen, set the End Position value so that the text is where you want it.
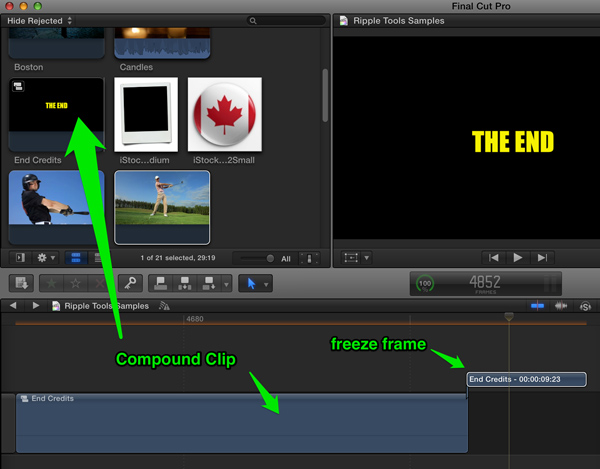
If the Text Scroll is the last clip in your project, it will end with this frame.
However, if you want a freeze frame of this frame with an adjustable duration, then you need to make a compound clip out of the title (File > New Compound Clip), give it a name, locate it in the Event, move the playhead to the last frame, then choose Edit > Add Freeze Frame to connect a freeze frame to the end of the title. Trim it as desired.
If desired, you can overwrite this connected freeze frame onto the primary storyline (Edit > Overwrite to Primary Storyline).
To apply the RT Tritone effect, drag it from the Titles Browser over the target clip or clips in your project.
If you want the effect to exactly match the duration of a single clip, then first make sure the playhead or skimmer is over the clip and press the X key to mark the clip range. Then, select the RT Tritone thumbnail in the Titles Browser and press the Q key to connect it to the clip range.
Once in the project you can drag on the title to reposition it or drag on either end to trim it. Now, select it, open the Inspector if necessary (Command-4), and select the Title Inspector.
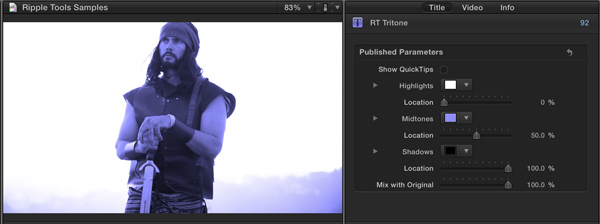
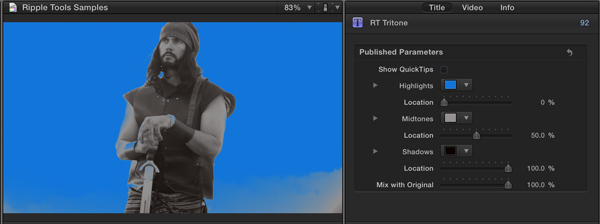
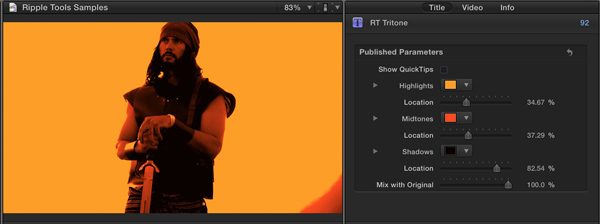
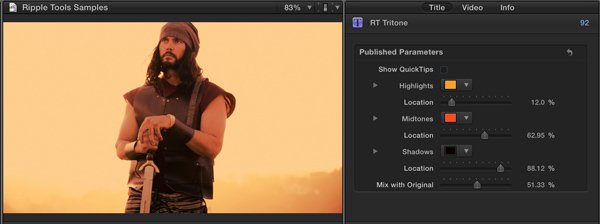
Enable Show QuickTips for some basic information on how to use the effect. RT Tritone lets you tint the midtones of a clip while keeping the highlights white and the shadows black. Just select the Midtones color. Alternatively, you can can also tint the highlights and/or shadows by selecting a Highlights color and/or a Shadows color. Setting the Midtones to a neutral grey removes all color from that luminance range.
The Location parameters allow you to increase contrast (by adjusting them for the Highlights and/or Shadows) or adjust the overall gamma (exposure) by adjusting the Midtones location slider. A little goes a long way – if you go to far with the any of these slider, you can end up inverting the colors.
The Mix with Original parameter lets you add back the original colors to modulate the impact of the Tritone effect.
To apply the RT Vignette effect, drag it from the Titles Browser over the target clip or clips in your project.
If you want the effect to exactly match the duration of a single clip, then first make sure the playhead or skimmer is over the clip and press the X key to mark the clip range. Then, select the RT Vignette thumbnail in the Titles Browser and press the Q key to connect it to the clip range.
Once in the project you can drag on the title to reposition it or drag on either end to trim it. Now, select it, open the Inspector if necessary (Command-4), and select the Title Inspector.
Enable Show QuickTips for some basic information on how to use the effect.
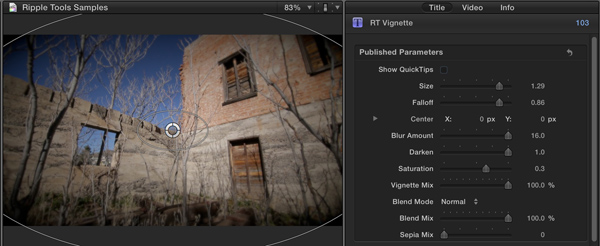
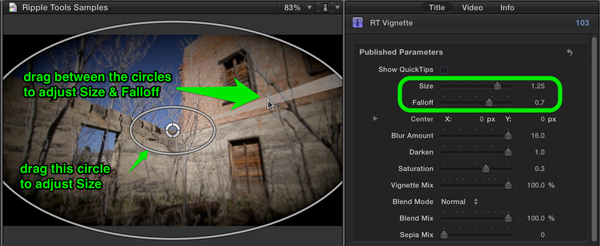
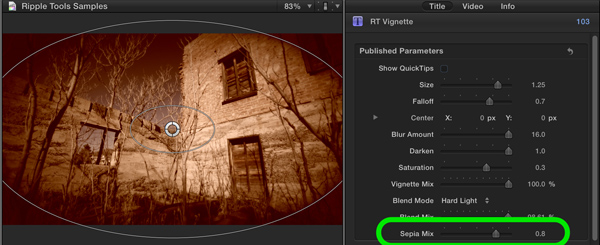
RT Vignette lets you darken and blur the edges of a clip. Drag in the Viewer between the two ovals to adjust both the Size and Falloff; drag directly on the smaller oval to adjust just the size. Or use the Inspector.
The Blur Amount, Darken, and Saturation parameters only affect the areas outside the large oval, with some overlap inside.
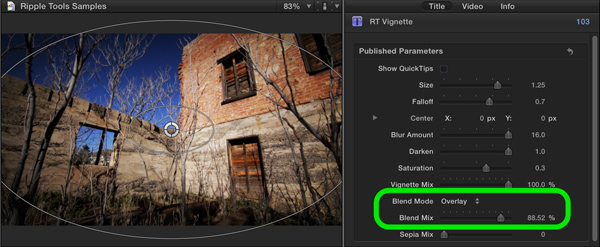
Vignette Mix adds back the original image as you drag left on the slider. Blend Mode lets you blend the original image in using a compositing mode for different effects. Try Overlay to start. Blend Mix modulates the impact of the Blend Mode – if it’s too intense, you can dial it back. Note that using a Blend Mode other than Normal will remove the blur from the edges.
Sepia Mix lets you add in a sepia tone to the clip.


